CI/CD
什么是 CI/CD
CI:持续集成(Continuous Integration)
核心实践:
开发人员每天多次提交代码到共享仓库
每次提交触发自动化构建和测试
快速发现集成错误,通常修复时间<10 分钟
关键价值:
减少集成地狱(Integration Hell)
早期发现缺陷(成本降低 100 倍)
保持主干代码始终可部署
CD:持续部署(Continuous Deployment)
核心实践:
自动化部署到测试/预生产环境
通过自动化测试验证发布准备度
手动触发生产环境发布
关键价值:
每个变更都可随时发布
降低发布风险
缩短发布周期(从月到天)
CICD 工作全貌
实践
以本站点 vitePress+ git action 进行实践
1.创建工作流文件 笔者使用 git Page 提供的静态托管服务,如图所示 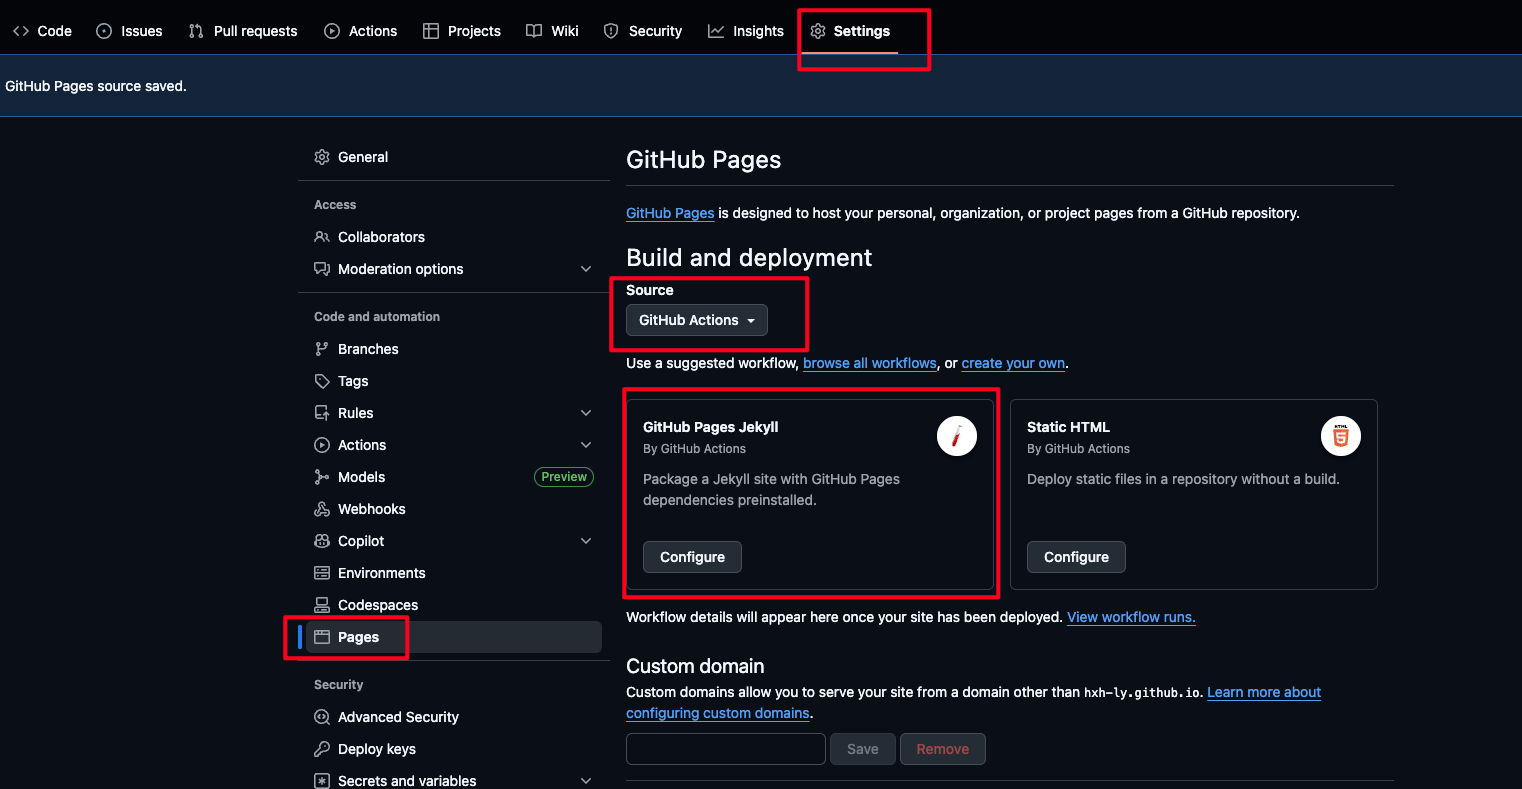 此操作会创建
 ./github/workflows/jekyll-gh-pages.yml,默认内容
# Sample workflow for building and deploying a Jekyll site to GitHub Pages
name: Deploy Jekyll with GitHub Pages dependencies preinstalled

on:
  # Runs on pushes targeting the default branch
  push:
    branches: ["master"]

  # Allows you to run this workflow manually from the Actions tab
  workflow_dispatch:

# Sets permissions of the GITHUB_TOKEN to allow deployment to GitHub Pages
permissions:
  contents: read
  pages: write
  id-token: write

# Allow only one concurrent deployment, skipping runs queued between the run in-progress and latest queued.
# However, do NOT cancel in-progress runs as we want to allow these production deployments to complete.
concurrency:
  group: "pages"
  cancel-in-progress: false

jobs:
  # Build job
  build:
    runs-on: ubuntu-latest
    steps:
      - name: Checkout
        uses: actions/checkout@v4
      - name: Setup Pages
        uses: actions/configure-pages@v5
      - name: Build with Jekyll
        uses: actions/jekyll-build-pages@v1
        with:
          source: ./
          destination: ./_site
      - name: Upload artifact
        uses: actions/upload-pages-artifact@v3

  # Deployment job
  deploy:
    environment:
      name: github-pages
      url: ${{ steps.deployment.outputs.page_url }}
    runs-on: ubuntu-latest
    needs: build
    steps:
      - name: Deploy to GitHub Pages
        id: deployment
        uses: actions/deploy-pages@v4
2.我们需要针对默认生成,创建新的修改
# Sample workflow for building and deploying a Jekyll site to GitHub Pages
name: Deploy Jekyll with GitHub Pages dependencies preinstalled

on:
  # Runs on pushes targeting the default branch
  push:
    branches: ["main"]

  # Allows you to run this workflow manually from the Actions tab
  workflow_dispatch:

# Sets permissions of the GITHUB_TOKEN to allow deployment to GitHub Pages
permissions:
  contents: read
  pages: write
  id-token: write

# Allow only one concurrent deployment, skipping runs queued between the run in-progress and latest queued.
# However, do NOT cancel in-progress runs as we want to allow these production deployments to complete.
concurrency:
  group: "pages"
  cancel-in-progress: false

jobs:
  # Build job
  build:
    runs-on: ubuntu-latest
    steps:
      - name: Checkout
        uses: actions/checkout@v4
      # 安装node.js
      - name: Setup Node.js
        uses: actions/setup-node@v4
        with:
          node-version: "20" # 推荐使用 LTS 版本
          cache: "npm"
      # 安装依赖
      - name: Install dependencies
        run: npm install
      # 构建VitePress站点,并设置全局变量,注意BASE_PATH配置需同步配置config.mjs里的为base: process.env.BASE_PATH || "",
      # 否则,部分资源会因为最终生成的域名形如 xxx.github.io<repo-name> 而加载不到
      - name: Build VitePress
        run: npm run docs:build
        env:
          BASE_PATH: /${{ github.event.repository.name }}/
      - name: Setup Pages
        uses: actions/configure-pages@v5
      - name: Upload artifact
        uses: actions/upload-pages-artifact@v3
        # 部署部分的修改
        with:
          path: ./.vitepress/dist

  # Deployment job
  deploy:
    environment:
      name: github-pages
      url: ${{ steps.deployment.outputs.page_url }}
    runs-on: ubuntu-latest
    needs: build
    steps:
      - name: Deploy to GitHub Pages
        id: deployment
        uses: actions/deploy-pages@v4
3.主要的修改解释
# 安装node.js
- name: Setup Node.js
  uses: actions/setup-node@v4
  with:
    node-version: "20" # 推荐使用 LTS 版本
    cache: "npm"
# 安装依赖
- name: Install dependencies
  run: npm install
# 构建VitePress站点,并设置全局变量,注意BASE_PATH配置需同步配置config.mjs里的为base: process.env.BASE_PATH || "",
# 否则,部分资源会因为最终生成的域名形如 xxx.github.io<repo-name> 而加载不到
- name: Build VitePress
   run: npm run docs:build
    env:
      BASE_PATH: /${{ github.event.repository.name }}/

- name: Upload artifact
  uses: actions/upload-pages-artifact@v3
  # 部署部分的修改
  with:
    path: ./.vitepress/dist
4.保存 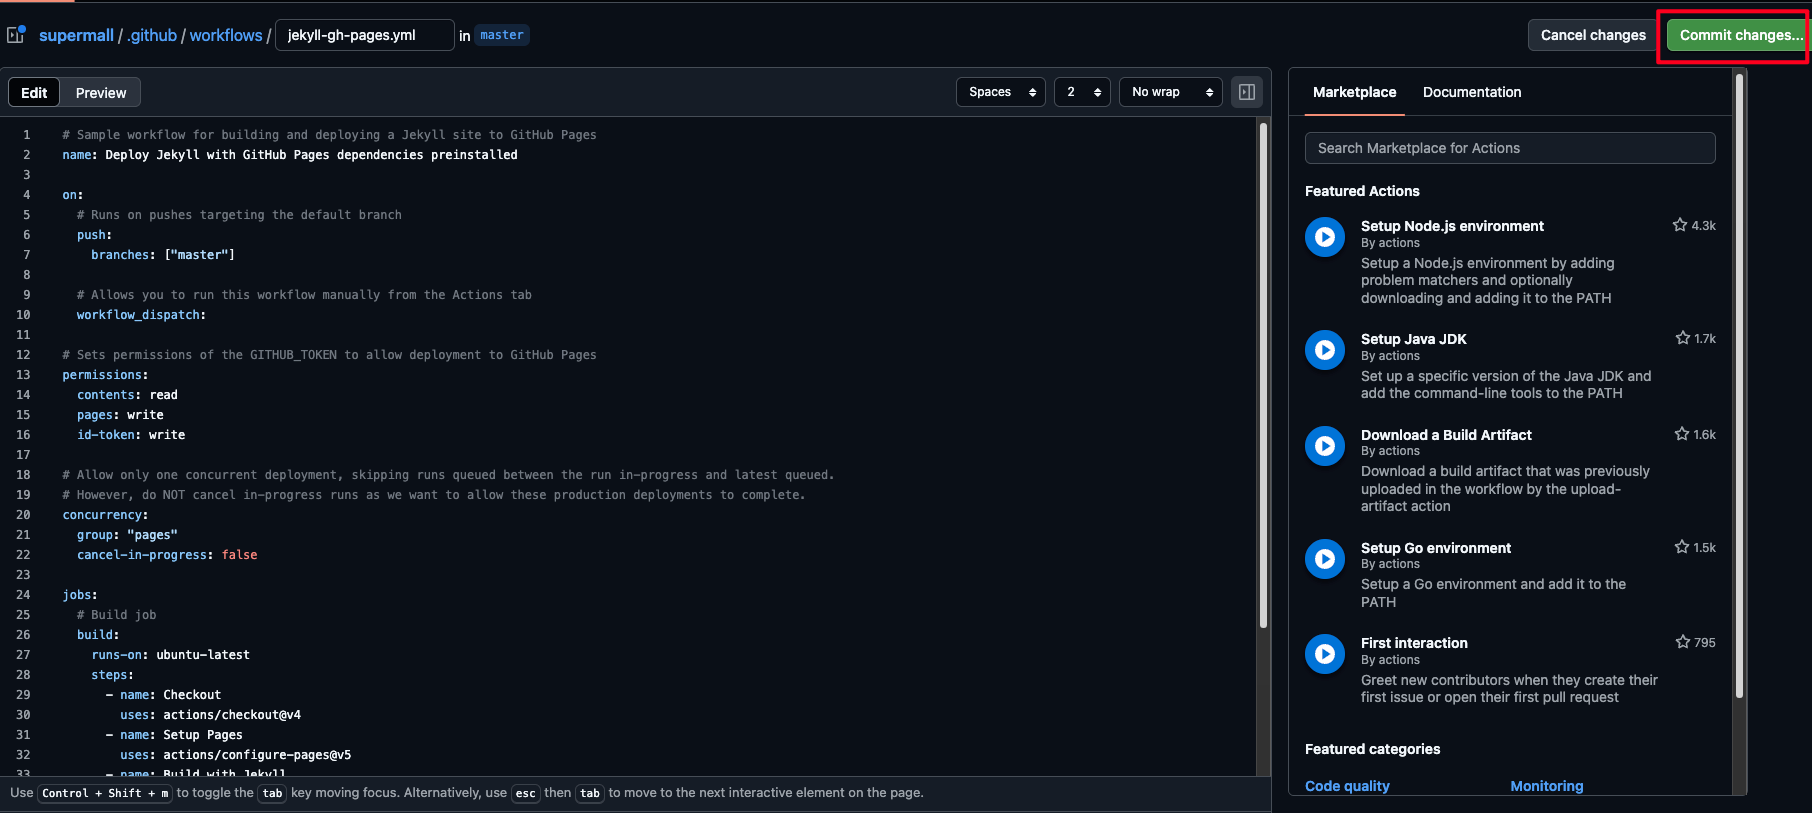
构建失败请查看: 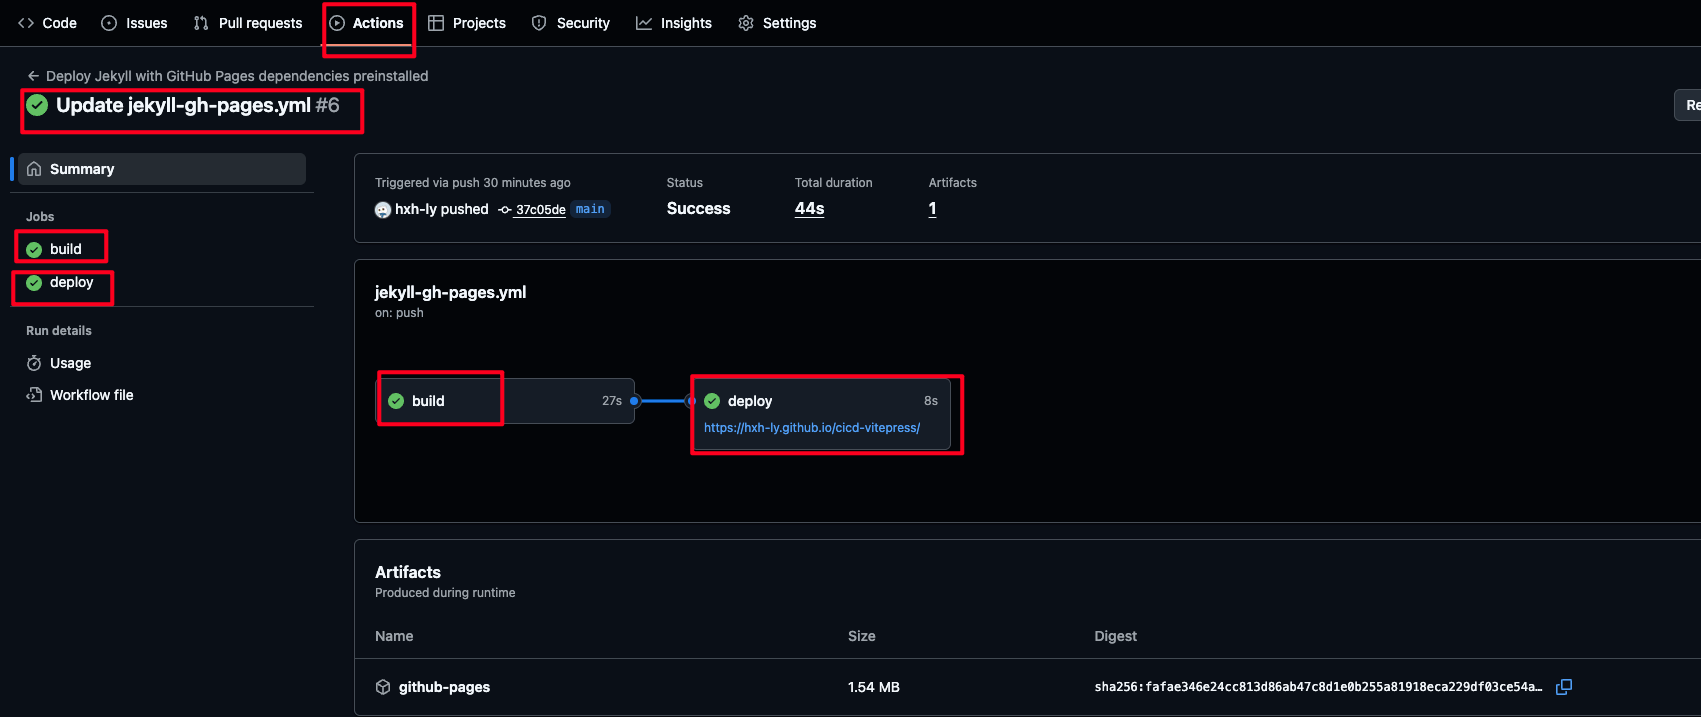
最后查看构建的网站 vitePress
npm 自动发布工具
实践 github action + 阿里云 ECS CICD 部署
架构图
开发者本地机器         -->         GitHub仓库         -->         GitHub Actions         -->         阿里云ECS服务器
    (git push)                  (监听push/webhook)            (自动构建、测试、部署)              (通过SSH部署文件)
一、环境准备
- 服务器端(阿里云 ECS)准备 a. 创建部署专用用户(推荐)
# 以 root 身份登录服务器
adduser deployer
# 为 deployer 用户设置密码
passwd deployer
# 将 deployer 用户添加到 sudo 组(可选,如果部署过程不需要sudo可省略)
usermod -aG sudo deployer

# 切换到 deployer 用户,生成 SSH 密钥对
su - deployer
ssh-keygen -t rsa -b 4096 -C "deployer@your-server-first-docker" # 一路回车,不设密码
cat ~/.ssh/id_rsa.pub >> ~/.ssh/authorized_keys
chmod 600 ~/.ssh/authorized_keys
b. 准备项目部署目录,如/home/deployer/www/your-project-name,并确保 deployer 用户对该目录有读写权限。
mkdir -p /home/deployer/www/your-project-namec. DockerFile 编写.在项目根目录下创建 Dockerfile
# 阶段 1: 构建阶段
FROM node:18-alpine AS builder
WORKDIR /app
# 首先复制依赖定义文件并安装依赖
# 利用 Docker 缓存层,只有当 package.json 或 lock 文件变化时才重新运行 npm ci
COPY package*.json ./
RUN npm ci
# 复制源代码并构建
COPY . .
RUN npm run build

# 阶段 2: 运行阶段
FROM nginx:alpine
# 将构建产物从 builder 阶段复制到 Nginx 的默认静态文件目录
COPY --from=builder /app/dist /usr/share/nginx/html

# 将构建产物从 builder 阶段复制到 Nginx 的默认静态文件目录
COPY --from=builder /app/dist /usr/share/nginx/html

# 暴露 80 端口
EXPOSE 80

# 使用 Nginx 运行(基础镜像的默认命令,通常可省略)
CMD ["nginx", "-g", "daemon off;"]可选,创建.dockerignore
node_modules
Dockerfile
.dockerignore
.git
.github
README.md
d. 服务器安装 docker
# 另一个版本
sudo dnf install -y \
ca-certificates \
curl \
gnupg2 \
redhat-lsb-core
# 1. 创建 RHEL 系系统存放 GPG 密钥的目录(通常已存在,保险起见创建)
sudo mkdir -p /etc/pki/rpm-gpg/

# 备份原有配置(可选)
sudo cp /etc/yum.repos.d/docker-ce.repo /etc/yum.repos.d/docker-ce.repo.bak

# 用阿里云源覆盖配置
sudo tee /etc/yum.repos.d/docker-ce.repo <<-'EOF'
[docker-ce-stable]
name=Docker CE Stable - $basearch
baseurl=https://mirrors.aliyun.com/docker-ce/linux/centos/8/$basearch/stable
enabled=1
gpgcheck=1
gpgkey=https://mirrors.aliyun.com/docker-ce/linux/centos/gpg
EOF

# 清理旧缓存(避免残留的官方源信息干扰)
sudo dnf clean all
sudo dnf makecache

# 彻底卸载可能残留的不完整 Docker 包
sudo dnf remove -y docker-ce docker-ce-cli containerd.io docker-compose-plugin

# 重新安装(使用阿里云源的完整包)
sudo dnf install -y docker-ce docker-ce-cli containerd.io docker-compose-plugin

# 检查 docker.service 服务文件是否生成
ls -l /usr/lib/systemd/system/docker.service

# 若文件存在,启动并验证
sudo systemctl daemon-reload  # 重新加载服务配置
sudo systemctl start docker
sudo systemctl status docker  # 应显示 active (running)
e. 配置 Docker Hub 镜像加速器
请将 https://your-mirror-id.mirror.aliyuncs.com 替换为你从阿里云容器镜像服务控制台获取的加速器地址。
注册 Docker Hub 账户并创建仓库 记下仓库名字,格式your-dockerhub-username/your-repo-name
sudo mkdir -p /etc/docker
# 创建或修改 daemon.json 文件
sudo tee /etc/docker/daemon.json <<-'EOF'
{
  "registry-mirrors": ["https://your-mirror-id.mirror.aliyuncs.com"]
}
EOF
# 重启 Docker 使配置生效
sudo systemctl daemon-reload
sudo systemctl restart docker
二、gitHub Action CI/CD 流水线
本地项目创建.github/workflows/deploy-to-ecs-docker.yml
name: Build, Push to Docker Hub and Deploy to ECS

on:
  push:
    branches: ["main"]
  # 上面是工作元数据
env:
  # --- 主要修改在这里 ---
  DOCKERHUB_USERNAME: ${{ secrets.DOCKERHUB_USERNAME }} # 你的 Docker Hub 用户名
  IMAGE_NAME: ${{ secrets.DOCKERHUB_USERNAME }}/your-repo-name # 你的 Docker Hub 镜像名,如 'myusername/my-frontend-app'
  # --- 修改结束 ---
  CONTAINER_NAME: "your-container-name" # 你的容器名称,如 my-frontend-app
  ECS_HOST: ${{ secrets.ALIYUN_ECS_HOST }} # 你的 ECS 公网 IP
  ECS_USER: ${{ secrets.ALIYUN_ECS_USER }} # 你的 ECS 登录用户,如 deployer

jobs:
  build-and-push:
    runs-on: ubuntu-latest # 最新版本的 Ubuntu 虚拟机上执行这个 Job
    permissions:
      contents: read
      packages: write

    steps:
      - name: Checkout code
        uses: actions/checkout@v4 #  检出代码

      - name: Set up Docker Buildx
        uses: docker/setup-buildx-action@v3 # Buildx 是 Docker 的一个扩展插件,支持更强大的构建功能,如多平台构建

      - name: Log in to Docker Hub
        # --- 主要修改在这里 ---
        uses: docker/login-action@v3
        with:
          username: ${{ secrets.DOCKERHUB_USERNAME }}
          password: ${{ secrets.DOCKERHUB_TOKEN }} # 使用 Token 而非密码更安全
        # --- 修改结束 ---

      - name: Extract metadata for Docker
        id: meta
        uses: docker/metadata-action@v5
        with:
          images: ${{ env.IMAGE_NAME }} # 直接使用 Docker Hub 镜像名
          tags: |
            type=sha,prefix={{date 'YYYYMMDD'}}-,suffix=-{{sha}}
            type=ref,event=branch
          # 生成镜像标签 这会生成类似 'myusername/myapp:20230915-a1b2c3d' 和 'myusername/myapp:main' 的标签

      - name: Build and push Docker image
        uses: docker/build-push-action@v5
        with:
          context: .
          push: true
          tags: ${{ steps.meta.outputs.tags }}
          labels: ${{ steps.meta.outputs.labels }}
          cache-from: type=gha
          cache-to:
            type=gha,mode=max
            # 构建并推送镜像
  deploy: # 部署任务
    needs: build-and-push # needs: build-and-push:确保只有在前一个构建任务成功完成后,部署任务才会开始。
    runs-on: ubuntu-latest
    if: github.ref == 'refs/heads/main'

    steps: #通过 SSH 部署
      - name: Deploy to ECS via SSH
        uses: appleboy/ssh-action@v1.0.0
        with:
          host: ${{ env.ECS_HOST }}
          username: ${{ env.ECS_USER }}
          key: ${{ secrets.ALIYUN_ECS_SSH_KEY }}
          script: |
            # --- 主要修改在这里 ---
            # 如果使用私有仓库,需要在服务器上登录 Docker Hub
            # 如果是公共仓库,则无需登录
            echo "${{ secrets.DOCKERHUB_TOKEN }}" | sudo docker login -u "${{ secrets.DOCKERHUB_USERNAME }}" --password-stdin

            # 停止并移除当前正在运行的容器
            sudo docker stop ${{ env.CONTAINER_NAME }} || true
            sudo docker rm ${{ env.CONTAINER_NAME }} || true

            # 拉取最新的镜像(现在从 Docker Hub 拉取)
            sudo docker pull ${{ env.IMAGE_NAME }}:main

            # 运行一个新的容器
            sudo docker run -d \
              --name ${{ env.CONTAINER_NAME }} \
              -p 80:80 \
              --restart=always \
              ${{ env.IMAGE_NAME }}:main
            # --- 修改结束 ---

            # (可选)清理不再使用的旧镜像,避免磁盘空间占用
            sudo docker image prune -af
Docker 镜像拉取超时问题解决指南
配置 Docker 国内镜像源
# 47.115.61.169
sudo dnf install -y nano # 下载工具
sudo mkdir -p /etc/docker
sudo nano /etc/docker/daemon.json
写入  { "registry-mirrors": ["https://docker.m.daocloud.io", "https://dockerproxy.com", "https://registry.docker-cn.com", "https://docker.mirrors.ustc.edu.cn",
  "https://hub-mirror.c.163.com", "https://ccr.ccs.tencentyun.com"]
}  # ctrl+o 回车 #ctrl+x退出

sudo systemctl daemon-reload
sudo systemctl restart docker
sudo mkdir -p /etc/docker
sudo tee /etc/docker/daemon.json <<-'EOF'
{
"registry-mirrors": ["https://<your-mirror-url>.mirror.aliyuncs.com"]
}
EOF
sudo systemctl daemon-reload
sudo systemctl restart docker
总结:整个脚本的工作流程
触发:开发者将代码推送到 GitHub 仓库的 main 分支。
准备:GitHub Actions 启动一个 Ubuntu 虚拟机,并检出代码。
构建:在虚拟机上,使用项目中的 Dockerfile 构建一个 Docker 镜像,并打好标签。
推送:将构建好的镜像推送到 Docker Hub 仓库。
连接:另一个任务通过 SSH 安全地连接到你的阿里云 ECS 服务器。
更新:在服务器上执行一系列命令:拉取新镜像、停止旧容器、启动新容器。
清理:移除旧的、不再使用的容器和镜像。
完成:部署完成。用户访问你的服务器 IP,看到的就是刚刚部署的新版本应用。
三、在 GitHub 仓库配置 Secrets
进入你的 GitHub 项目仓库的
Settings -> Secrets and variables -> Actions。添加以下 Secrets:
ALIYUN_ECS_HOST: 你的 ECS 公网 IP。(不变)
ALIYUN_ECS_USER: 你的 ECS 登录用户(例如 deployer)。(不变)
ALIYUN_ECS_SSH_KEY: 部署用户的 SSH 私钥。(不变)
DOCKERHUB_USERNAME: 你的 Docker Hub 用户名。
DOCKERHUB_TOKEN: 你的 Docker Hub Access Token(推荐使用 Token 而不是密码,更安全)。
- 获取 Docker Hub Access Token:
登录 Docker Hub 网站。
点击你的用户名,进入 Account Settings。
选择
Security -> New Access Token。为 Token 提供一个描述(例如 github-actions-for-my-app),并设置读/写权限。
生成后,立即复制这个 Token 的值,它只会显示一次。
ecs 服务器绑定域名,开放 https
- HTTP 仅需服务器开放 80 端口并配置 Web 服务(如 Nginx/Apache)即可;
- HTTPS 需要满足 3 个条件:
- 服务器安装 SSL 证书(与域名匹配);
- 开放 443 端口(阿里云安全组 + 服务器防火墙);
- Web 服务正确配置 HTTPS(监听 443 端口,关联证书文件)。
npm 发布
# 可选 使用nrm 管理 registry
npm install -g nrm --registry=https://registry.npmmirror.com/
nrm ls
nrm use taobao
nrm add myrepo https://registry.myrepo.com/npm/ # 添加自定义源
nrm test taobao  # 测试淘宝源速度
nrm del myrepo # 删除源# 需切换到npmjs
npm set config registry https://registry.npmjs.org/
npm login
npm version patch #更新一个小版本,如1.1.0 -> 1.1.1,如bug修复;
npm version minor #更新一个中版本,如1.1.0 -> 1.2.0,如新增功能;
npm version major #更新一个大版本,如1.1.0 -> 2.1.0,如重构架构;
npm publish # 发布 (不需要走代理就能发)使用cimi工具管理 cimi 是一款全自动 npm 发包工具,一行命令帮助你 git replase、创建 git tag、发布 npm 包。
Cimi 自动生成新版本号,自动生成 commit message,创建 tag,push 到 github,最后发布到 npm 中,整个过程只需要一行命令,解放你的双手!
cimi patch #更新一个小版本,如1.1.0 -> 1.1.1,如bug修复;
cimi minor #更新一个中版本,如1.1.0 -> 1.2.0,如新增功能;
cimi major #更新一个大版本,如1.1.0 -> 2.1.0,如重构架构;

#而分支默认为master,如果主分支为其他分支,应这样使用:
cimi patch main
cimi patch betasudo tee /etc/clash/config.yaml <<-'EOF'
xxx 查看代理文件
EOF本地配置 ssh
# 本地已有密钥对,没有就生成
ssh-keygen -t rsa -b 4096 -C "your_email@example.com"
# 查看公钥
ls -la ~/.ssh && echo "\n=== 公钥内容(如果有)===" && cat ~/.ssh/*.pub 2>/dev/null

# 阿里云服务器配置公钥

# 连接
ssh -i ~/.ssh/id_rsa root@47.115.61.169
docker 常规操作
sudo systemctl start docker
systemctl status docker.service
vim nano /etc/docker/daemon.json
docker info
centos 下载使用 clash
https://github.com/doreamon-design/clash/releases/
mkdir /tmp
wget https://github.com/doreamon-design/clash/releases/download/v2.0.24/clash_2.0.24_linux_amd64.tar.gz
tar -xvf clash_2.0.24_linux_amd64.tar

mv clash /usr/local/bin/clash

clash -v

sudo mkdir -p /etc/clash
cd /etc/clash

sudo wget https://cdn.jsdelivr.net/gh/Dreamacro/maxmind-geoip@release/Country.mmdb
sudo chmod 644 /etc/clash/Country.mmdb

export http_proxy=http://127.0.0.1:7897
export https_proxy=http://127.0.0.1:7897

systemctl status clash
sudo systemctl daemon-reload
sudo systemctl restart clash
sudo systemctl start clash

nano /etc/systemd/system/clash.service


sudo systemctl daemon-reload  # 重新加载systemd配置
sudo systemctl enable clash  # 设置开机自启
sudo systemctl start clash   # 立即启动Clash

curl -I https://www.google.com# /etc/systemd/system/clash.service
[Unit]
Description=Clash Proxy Service
After=network.target
[Service]
Type=simple
User=root
ExecStart=/usr/local/bin/clash -d /etc/clash
Restart=on-failure
[Install]
WantedBy=multi-user.target